Welcome fellow photographers! “Howdedodat “ is a professional commercial photography “How To” site explaining photographic lighting and lighting special effects, geared toward the novice and student photographer. The author and photographer is a long time professional willing to share with you some of his techniques and processes. Today’s photograph is entitled “The Trumpet Player”.
|
|
| Camera - Hasselblad 500 CM |
Lens - 150 mm |
| Aperature -f 5.6 |
Shutter Speed - 1 second |
| Film - Kodak E100s |
Lighting Equipment - Norman Flash and Mole Richardson "mini Mole" tungstan light |
| Diffusion sources - None |
Filters / Gells - None |
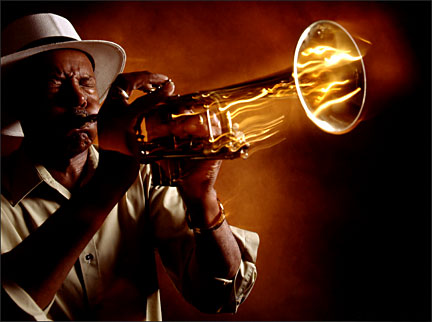
The Trumpet Player
This is the kind of commercial photography assignment I love. Subjective! This photograph was one of several shot for a Graphic Design Firm Self promotion piece. Basically, we wanted to make pretty pictures that were “a little bit different.” I actually came away with two really nice portfolio pieces from this job, both using a favorite technique of mine, mixing strobe and tungsten light. I’ll show you the “Dancer” shot some other time.
Mixing strobe and tungsten light is much easier that most photographers think. The main obstacles are these:
Color Temperature – By most people, tungsten light is a term used to describe almost every continuous burning lights other that florescent, mercury and sodium vapor lights. Most household lamps and “tungsten” and photographers use studio tungsten lights. ALL light sources have that’s called a color temperature. When you used to get your slides back from the lab and the colors were either green or yellow, you were looking at the results of shooting under lights emitting different color temperatures. Usually, strobe light is color balanced to match daylight, or about 6,000 K. The typical studio tungsten light has a special bulb designed to burn at a particular color temperature, either 3400 or 3200 K. There are filters (gels) you can use over your studio tungsten lights to “color correct” the lights so that they will match your strobe lights. (I realize that this isn’t a very good explanation or color temperature, click here for a better explanation) So I solved the color temperature issue by filtering the tungsten light so that it matched the color of my strobe light. By the way, these filters are made primarily for the film industry. Have you ever wondered why a movie scene can show florescent lights along with windows with daylight outside? That’s because either the fluorescents or the windows have been filtered.
Shutter speed issues – With strobe, the shutter speed is usually a forgotten issue, at least in the studio. If the studio is relatively dark, the shutter speed of the camera can be set at pretty much anything you want, as long as your camera can sync at that speed and your speed is fast enough to eliminate the ambient from the room and modeling lights. As long as the “duration of flash” is shorter than your shutter speed setting, the exposure will not be affected by your shutter speed. When you use both strobe and tungsten light, as I did here, the tungsten light determines the shutter speed. The trick is to match the aperture setting related to both the tungsten light and strobe, and then adjust the shutter speed to give you proper exposure for the tungsten light. Get it? Just use the aperture given to you by the flash meter and then use a shutter speed that makes the tungsten light exposure work too. Usually, the shutter speed will be a tad on the slow side, but in this case, that fact works to our advantage.
The strobe’s main light was placed well to the side, or even behind the subject slightly. This gives a rim light effect and shots a lot of shape to the model and still keeps the important parts (face and hands) in the light. Remember, try to light as little of the subject as possible and still get the important things readable. This will give you drama. The basic rule of thumb is, the more shadow in the picture, the more drama you get. Drama = shadow. Remember that! There are times when drama isn’t a good thing either, but in this case, that’s what we were going for. Also, very little fill light was used to maximize the shadows and to add to more drama of the photograph. Little fill light = deeper shadows = greater drama.
A little tangent on lighting… It’s not how much light you use that matters, it’s what the light is illuminating that counts. See how the model has very little light hitting him, but where the light hits, you get all the visual information you really need. You see his eyes, you can make out the trumpet, and you can see texture in the torso.
Most novices over light. The progression of the lighting student goes like this.
First you have this light and point it at a subject. Wow, this is cool!
The next step is you discover that a larger light source (umbrella) usually makes everything look better.
A little later, you discover the concept of fill light and realize that all those black shadows that were starting to bug you, could be controlled by a little fill light. You take your third step and add a bunch of fill.
The next step is that you discover that the direction of the light really does matter. Even an inch to one side or another can make a really big difference. You learn to light for shape. This is probably the biggest step you will take.
Then you figure out that since you can control the shape, if you use those old smaller light sources you had at the beginning, you can even get a little more shape and texture out of the subject.
Finally you realize that if you back off on the fill a little bit, you even get more shape. Very cool! As soon as I get to the next step myself, I’ll fill you guys in.
The background was also lit with strobe and flagged off in such a way as to emulate the shape of the model and prop. A warming gel was added to the strobe light to emphasize the “warming” effect of the background. The 12 x 20 canvas background was a custom painted background made by a local artist.
The key to this shot is the dramatic lighting on the subject along with the motion glare from the trumpet. The Strobe went off and “froze” both the model and trumpet in place. The tungsten spotlight was pointed at just the trumpet and not the model. That way when the model moved to create the special motion effect, the model did not appear to move because he was not being lit by any of the tungsten light. (Or as little as possible, anyways) We experimented , using polaroids, quite a bit to determine the best pattern of movement by the model. We had the guy shake the trumpet, sway the trumpet, and bob the trumpet. You name it, we did it. As soon as the flash would go off, the model would start to move. There was a lot of film shot because the motion was not “repeatable”, sort of like performance art. We also experimented with shutter speeds to determine if we wanted to over expose or under expose the blur. Since we left the shutter open for so long, we had to totally darken the studio so that the ambient studio light or the strobe modeling lights would not affect the exposure or subject lighting. And No, the model wasn’t really a trumpet player, just a guy that looked the part.
Any questions? Feel free to contact me. Studmuffin@foodportfoio.com
|
|