|
|
||||||||||||||||||
|
|
|
||||||||||||||||||
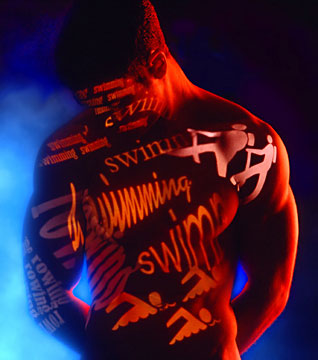
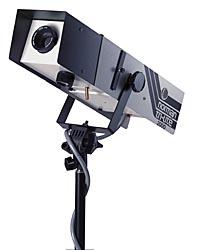
Blue Tony This image was shot for Pittsburgh Magazine to illustrate an article on various sports in the city. Doing illustrative photography like this is a lot of fun because you are pretty much bound only by your imagination. The client usually wants you to be as creative as you can possibly be. Pushing the envelope makes everyone look like a genius. There are really two different techniques that make up this image. 1. The type and graphics projected onto the figure were created by using two different Norman Tri-lites. Basically, a Tri-lite is an optical spot light, or in other words, a slide projector flash head. We created three graphic slides using Kodak kodalith film and projecting the slides through colored yellow gels. The Tri-lites were positioned in such a way as to “warp” the graphics around the body, giving the image ever more of a surreal look. The main light (Norman FS10 Fresnel Spotlight) was filtered orange and placed to the right and well behind the subject to create an edge light effect and to leave the majority of the model dark so that the projected slide images would become more apparent. The background light was also lit with a spotlight and filtered blue to enhance the blue canvas background. The use of spotlights in this situation prevented light spillage from spreading to areas where I didn’t to go. Sometimes the shadows are just as, if not more important, than the lit areas of you subject. Let me explain. Before I begin to describe how the Turbo Filter works, let me set the stage for you… In a darkened room, if you place soft focus filter in front of your lens, and set off a flash to light an object, the resulting image produced would appear “soft” Right? If you placed the flash way off to one side and set off the flash with the same soft focus filter on you lens, the side of your subject facing the strobe would appear soft while the other side would appear to be black. (since it wasn’t being illuminated by the flash) Well, if it’s black, it’s not soft, is it? Then, what would happen if you removed the soft focus filter and place a flash head on the exact opposite side of the subject (the black side) and made a double exposure on the same piece of film you just used to make the soft focus shot. Starting to catch on? You would end up with one side of you figure sharp and the other side of the image soft. Then what could happen if you cold make this double exposure with soft focus and sharp focus all in a single exposure? Well, that’s what a turbo filter does. (picture below) 2. The second “special effect” used in this image was a “Turbo Filter”. The Turbo filter is basically a Plexiglas disk connected to a motor to make it spin at a high rate of speed, mounted in a metal housing with an opening for your camera to look through.. The disk is divided into three pie shaped areas of different degrees of diffusion. One third of the disk is perfectly clear, one third of the Plexiglas is sand blasted so that is functions as a slightly diffused soft focus filter, the last third of the disk is even more diffused making it an extremely soft focus filter. The Turbofilter is placed in front of the camera lens and connected to its controller box. On the controller box there are places to plug in three flash syncs. If you plug a flash into the #1 nipple and depress the shutter on your camera while the disk is in motion, the flash unit that is plugged into that nipple will go off while the clear part of the disk is in front of the lens, thus giving you a clear, undiffused image of anything illuminated by that particular light. Any flash plugged into the # 2 nipple would go off when the “slight” diffusion section of the filter is in front of the lens. This would make anything being illuminated by that strobe look “slightly soft”. Flash nipple # 3 syncs you to the “heavy diffusion section of the Plexiglas disk, making anything illuminated with that light, heavily diffused. Keep in mind that the Plexiglas disk is spinning very fast. So fast, in fact, that you can set your shutter speed to 1/30 of a second. That will give the spinning disk plenty of time to make a complete revolution, setting off all three flashes. Keep in mind that these three flashes need to be independent unites. You can’t have the same power pack plugged into two sync plugs. You can have more that one head, or even more that one pack, plugged into any of the flash nipples, just not the same pack. Also, you can’t have any of your power packs using an optical slave unit because there will three flashed going off in a very short duration of time, causing the first flash going off to trigger the optical slave. If you want to tie more that one pack together, you will either need to use radio slaves or Hard wire the packs to trigger together. The trick is to light only selective areas of the image with the three different lights so you can control what areas of the image look soft and which do not. You don’t have to use all three areas of the disk either. In fact, in my image here, I used only the #1 and the #3 flash syncs nipples of the turbo filter. All of my flashes except the background light were plugged into the #1 (non diffused) sync nipple. This way everything in my image was rendered sharp, with the exception of the background, making the arm sort of “blur” into the background. Using this toy takes a lot of experimentation. The real key is to illuminate separate areas of the image with different degrees of sharpness. And whatever you do, don’t move the light stand holding the disk while it is spinning. I have heard stories of the thing blowing up into millions of flying pieces. In most tabletop situations, I prefer to use smaller light sources than most photographers. Small light sources like the spotlight on the background allow me to more accurately manipulate the light, making it do what I want it to do. The same goes with people photography. I have used the turbo filter effect in tabletop situations, without actually using the Turbofilter. To do this, you have to set the shutter speed to about 1/2 second and then turn out all the lights. I plug in the lights that I want to go off when I have a diffusion filter over the lens, to the lens sync nipple. At the same time, I have my assistant ready to manually set off the “undiffused” strobe when I give the signal. I hold the filter in front of the lens, set off the shutter (setting off the “diffusion” lights), yank the filter away from the lens and signal the assistant to set off the undiffused flash.
|
|
||||||||||||||||||
|
|||||||||||||||||||
|
|
|
||||||||||||||||||