| The set-up
When you’re a commercial photographer, some projects have those great big budgets and some just don’t. This is one of those “don’t” kind of projects. This budget was for a half-day shoot and I still can’t remember if they paid for the film or not. The client was a healthcare company (your insurance money hard at work) that produce an in-house publication. They were doing an article about an ambulance company at one of their satellite locations and need some photos to illustrate the article. The Art Director showed me a sample photo of what they wanted the shot to look like. I figured “what the heck”, it looks like fun, I’ll do it.
After meeting with the ambulance company personal, we took their advice and drove around town (their town, not ours) and finally decided on a location. We called for the ambulance and start to set things up for a shot later that day.
This project had a few interesting challenges. I had been playing with a technique in the studio where I used strobe and tungsten light together combined with camera movement. This causes a double exposure effect, one exposure from the flash of the strobe and another from the long exposure of the ambient light. The effect created a double exposure of a crisp image overlapping a blurred image. Kind of a cool effect, but I had never done this kind of thing outside the controlled environment of the studio.
Since we had chosen a location based on the background and not on the availability of electricity, we were unable to use the Norman electronic flash equipment that we had brought with us. Fortunately, we also had with us, three old Vivitar 283 “on-camera” flash unites that I had left over from my Wedding days, centuries before.
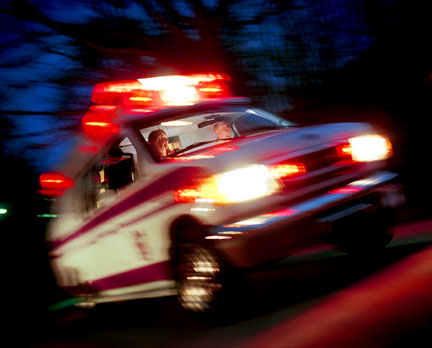
We wanted to light the two people in the front seat of the ambulance and wanted to blur the outside of the van, making it look as if it were moving. We figured that the flash would freeze the people and that the ambient outside light would be low enough to allow me to “shake” the camera around a little and blur the ambulance. We figured that the best time to shoot was right before dusk. That would allow the light level would to be low enough to mandate a long enough shutter speed to create a good blur. (1/2 – 1 second – from previous experimentation). We choose a wide angle lens and canted the camera to add a little drama.
Photo Techno stuff
One of the more difficult challenges was to light the people in the shot and still hide the flash unites. We used radio slaves on each of the strobes and experimented until we found the best spots to place out three strobes. One strobe was set in the back of the ambulance and bounced off of the ceiling to light up the passenger area of the ambulance. A second strobe was placed low in between t he two models and bounced into a flex-fill reflector leaned up against the dashboard, front lighting both models. The third flash was placed outside the ambulance pointing into the driver’s side mirror so that the light reflected directly onto the driver’s face, giving him a very nice rim light effect.
As we refined the shot with Polaroid after Polaroid, (yes, it was in the old days) we discovered that if we exposed for the ambulance, the sky was washing out and ended up void of any color. If we exposed and got a good sky color, the ambulance was way too dark. Normally, I’m kind of a control freak, always worrying about proper focus, color temperature and such, but now I was sort of “winging it”. I came up with a solution to our dilemma that even surprised me. Why not use the van lights to light the ambulance? It was one of those times where we really didn’t have much time to worry about little things like color temperature, the light was fading fast and we had to do something right now. We ended up swinging my van around to the side and pointing the headlights at the ambulance. The first couple of polaroids didn’t look too bad but we ended up adding a little neutral density to tone the headlights down a little.
I would like to tell you that the data I have listed below the photo is correct, but to tell you the truth, I really can’t be sure what the heck the exposure was. The light was dropping and I was bracketing my butt off. To be honest, I have no freaking idea what the final exposure was. When you do a shot like this, it is sort of like “performance art”. When you trip the shutter, the flash goes off the freezes anything illuminated by the flash. If the shutter stays open, the film continues to record everything being illuminated by the ambient light. We were tripping the shutter and then moving the camera to blur the ambient exposure.
We experimented with so many different types of movement that I really can’t be sure what I was doing in the frame that we finally selected. Some times we moved the camera around in circles and other times we moved the camera linearly from side to side or up and down. Sometimes the movement was slow and sometimes the movement was fast. And after it was all said and done, I still don’t know what technique worked the best.
Because the light was dropping so quickly, we really didn’t spend time documenting the film as it was shot. Once you get to a certain time of day, the light level drops REALLY fast. If you made two identical length exposures, the second one would be darker because the light had dropped during the exposure enough to make a difference. The later in the day, the deeper blue, the sky appeared, until finally, the sky went black and we were obviously finished with the shoot. From the time I think that the light was “just right” to the time it was too dark, I’m guessing was maybe five minutes.
When we finally got the film back from the lab, we were all pleasantly surprised with the results. The color temperature was a little warm, like I knew it would be, but I think that it added to the drama of the shot. So it ended up being a cheap, fun, interesting, educational, and successful shoot for both the client any myself. Some times you have to take some chance and try a little something new. And sometimes you screw up, end up with crap, and loose the client.
Of well… Sometimes you eat the bear and some times the bear eats you.
|