|
Ok, some of the things that I’m about to tell you are top secret. If you tell anyone else, I might have to kill you. I’m letting you in on some of the tricks that do separate me from my competitors. So, if you’re a competitor of mine, please don’t read this.
Some of you probably don’t realize this, but a food photographer doesn’t get to play with the food, except to maybe move it a hair or two when the food stylist isn’t looking. I have fork scars on the back of my hands from severe wounds caused by a few irate food stylists angered by me actually touching the food. Only the food stylist touches the food, if I’m lucky, I get to pick the lens, the camera angle, and the lighting, sometimes. If any of you are in the business of commercial photography, you already know that our primary job is to make our client happy with what we do, secondarily; we are in the business of making great photographs. Sometimes we actually get to do both, depending on how good of a client we have. What I’m trying to say is, most of the choices that we make in a commercial photo shoot, are subject to the approval of the client and of the other members of the crew. It’s a complicated subject, maybe we’ll talk about it at another time.
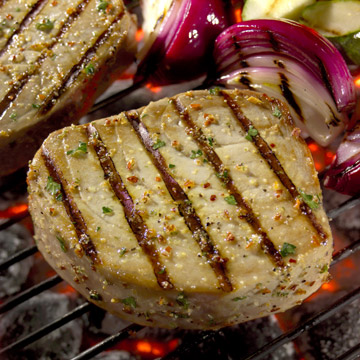
So here’s the project. We’re to photograph a tuna steak on a grill for a local grocery store chain direct mail promotion. This is a fun project. If you’re doing food photography for packaging or advertising, you sometimes have very little creative license, but on these kind of editorial jobs, the object is to simply make appealing photos marketing the chosen subject matter. In other words, make pretty pictures. The client simply wants us to promote grilling their Tuna.
 Here’s how we did it. Here’s how we did it.
Here’s the part that you can’t tell anyone about. How do you think we keep the crew from asphyxiating from the grill fumes? Right, we fake it.
Step one. Sawzall off the bottom of the grill. (If you’re doing this at home, I suggest that you either first consult with your wife, or better yet, borrow the neighbor’s grill) Set the bottomless grill on top of a glass or Plexiglas surface that is supported from the two ends. The glass tableshould be elevated off the ground so that you have enough room underneath the glass to place an upside down light box. On top of the glass table surface, we placed a piece of frosted plex, and on top of that we placed a piece of orange gel. To simulate burning charcoal brickets, we used new charcoal brickets with “fire place” ash (stylist supplied fire place ash is preferred so that I don’t have to remember to bring in my own) sprinkled over and between the brickets. We used a stick to make spaces in the ash where we wanted the “fire” (gelled light from down below) to show through. The ash dirties the new charcoal to make it look like it’s already half burned. I know of some photographers that will use baby powder sprinkled over the charcoal to give a similar effect. You will need to experiment with the intensity of the “fire light” to get the desired brightness.
On this shot we used a black metal grate. I have sometimes used a new chrome grate and if you do, you need to add some type of white reflection in the chrome, or everything looks artificial. I prefer the black grate, big time.
If you ever stick you nose down into a grill while it’s burning, you would see, through singed eyelashes, that the environment is pretty dramatic. You will want to “skim the light” as much as possible across the food, keeping as much light off of the charcoal as possible. This will help the fire to look more dramatic. I used one light (big 10”) and some mirrors and reflectors to kick light back into areas that needed a little help. I like to use mirrors to reflect light back into the subject because then I can be very specific where that light is placed. If you use white cards or other types of reflectors, the light is much less controllable, and just sort of washes out large areas of the image instead of small specific areas. The intensity of the lighting was very low to create a minimum depth of field. If your faking something, it's a good idea to keep it out of focus. I also used my “true fill” light set at a really low intensity to keep the light ratio as dramatic as possible. (I hate to brag, but I’ll tell you more about my big 10” at another time.)
At this point I’ll tell you a few stylist tricks. The grill marks are put on one at a time with a metal bar that has been preheated over a flame on the stove. The direction of the grill marks is always an issue of discussion relating to the overall composition of the shot. NOTHING in a shot like this, “just happens”. The position of every little element, no mater how small, is there because we either wanted it there, or it was there because we couldn’t change it.. The tuna and veggies were lightly oiled before the shot.
|