Photographic Light Sources
Q: I here about all these different lights. What are they, and what are they used for?
A: Lights are tools to be used by photographers to create their final products. There are many different kinds of lights, but for this post, I'll just deal with those light sources related to studio strobe lighting. Before I begin, I'd like to say that like other tools, lights can be used any old way the photographer wants. You can pound nails with a pair of pliers and you can surely light a portrait with a bare flash head. Will the portrait taken with a bare flash head look good? Maybe… It could happen. My mission here is to list some of the more common light sources related to strobe photography and tell you how I find myself using them. I'm sure that I'll leave a few items out and I'm sure that Eric will be glad to correct me. Here goes…
I use Norman Strobe Equipment. Why? Because when I was getting into the business, I had a friend that had Norman, and if I selected the same manufacturer that he had, I would be able to borrow his stuff to supplement my own. (and I did) I like Norman, but I know that there are a lot of good manufactures out there. I'm just letting you know this because some of the the lights that I will mention will be Norman Brand names, or some items may be specific to Norman and not other manufacturers. Do I like Norman? Ya, they're ok, they give you a good cost per watt second ratio, but they're nothing fancy.
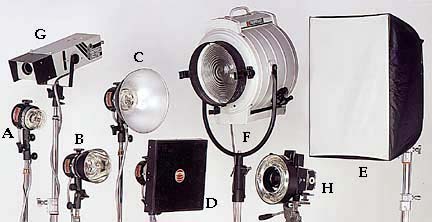
(A) Bare Bulbs: What I call a bare bulb, is a strobe head without a reflector. Without a reflector, the light goes pretty much everywhere, including your lens, if you're not careful. The only time I use a bare bulb head is, on occasion, for a portrait background light. If you find yourself in a really tight space, and you don't have much room to work, you can put the bare bulb on a floor stand directly behind the subject, pointing toward the background at a distance of about two feet. By pointing the head at the background, you are essentially using the strobe housing as a gobo to keep light from pouring into the camera. At a distance of two feet, the light gives a very nice graduation effect (light to dark) on the background. If you don't own light boxes, you may not know this, but you use bare heads inside of light boxes.
(B) Small (wide angle) reflector: Norman's standard reflector is 5" in diamater. Some light manufacturers actually build their light heads with a reflector built into the head. The light is reflected from the reflector in a relatively wide spray. I find myself using the 5" mostly with umbrellas on location (I almost never use umbrella's in the studio) . They are also good for bouncing off of ceilings and walls and for shooting into "light walls" (large translucent material wall). If you're going to bounce light off of walls, let me warn you, Be careful that the walls are painted a neutral color. If you bounce light off a green wall, you end up with green light. Bounced light is a very nice source and the light quality can be controlled by changing the distance form the light to the wall. Another good thing about 5" reflectors is that they "nest" over the flash tube protector, and take up no additional space when you travel.
(C) Large reflector: Norman makes a 10" (diameter) reflector which I will use on occasion. Since the reflector is so wide, it isn't as good as the 5" when used with umbrellas. It ends up blocking a page portion of the umbrella, thus partially defeating it's purpose. I like to use the 10" for bouncing into walls and off ceilings. The narrower spray of light makes this reflector more controllable and more efficient. When I say efficient, I mean that it projects more light (less is loss to spill where you don't need it) and therefore requires less watt seconds, which translates to less money for a given aperture. This isn't much of an issue in the portrait business, but in the commercial world, this could translate to some big bucks. Say for example you're shooting in a Steel Mill. You're currently using all 5 of your power packs and you REALLY need another stop of depth of field. Dou know what that one stop more light would cost? About 8-10 Grand! You would have to double the number of power packs (double = one stop)! That's why it pays to have some "efficient" reflectors in your lighting arsenal.
Umbrella: (you know what this looks like) I mentioned to you in my previous article that most portrait photographers use umbrellas and that the round catch lights seem to be more preferable. This statement started a little squabble, and to tell you the truth, I may be out of line on this one. I don't know when the last time I was in a Portrait studio, probably five years. Maybe things have changed, but back then (you know, when the snow was really deep, and you had to walk 10 miles up hill to and from school), they used umbrellas. Personally, I don't care much for umbrellas and only use them on location when I need to light large areas. Umbrellas are great for spreading relatively "soft light" over a large area. Umbrellas such when it comes to light control. When I shoot portraits, either in the studio or on location, I will always use boxes. Yes square boxes that create square catch lights. I think it looks great. Another thing I don't like about umbrellas is the fact that they tend to break whenever they get knocked over. And they will get knocked over. One suggestion for ya. When you buy umbrellas, buy the biggest you can find. It's America, bigger is better! (sorry Eric) If you want the effect of a smaller umbrella, you can always scoootch the umbrella in close to the head.
(D) Grid spots: I think grid spots are the coolest things. If you've never seen one, it looks like a metal honey comb that you put over your light reflector. Each comb prevents the light from spreading out. The effect is that it creates many columns of light right next to each other, creating a spot light. Norman makes 10" and 5" grids and I hear that they are making another size too. When you get old like me (41), you stop caring about new equipment (unless it's really cool). I own 4 10" grids and some a set of 6" Speedo grids that I "rubber band" to the front of 5" reflectors. The big disadvantage to the 10" Grids is that the are large and take up a bunch of space when you travel. The advantage to the 10" grids is that they are more "efficient" and that I don't have to "gumband" them to the reflectors. Grids are really useful and I would recommend that even the beginner get a couple to be use for "hair" and "background" lights.
(E) Light box: After fire, the greatest invention ever created by man, was the light box. The light box will make even the rank novice photographer, at least mediocre. (especially in regards to product photography). A light box is most commonly, a fiberglass frame (tent poles) holding open a five sided tent created from four sides of black nylon and one side (the farthest from the light) from translucent white nylon material. Light boxes come in many sizes. I have light boxed that are about 5'x3', 3'x2', 16"x20", and I have a couple of round boxes too. What's great about the light box is that it is "controllable" The light goes where you point it, and doesn't go where you haven't pointed it (unlike an umbrella). Flare is less of a problem from a box. I'm about to tell you a secret, and don't tell anyone… Probably the biggest problem with amateur portrait photographers, is that they don't understand the concept of fill light. A fill light should "fill in" the shadows of the main light. The ONLY (I can see the posts now) way to do this is to place the fill light so that "it" does not create any shadows itself. This is impossible. Every light creates a shadow. The BEST place to put a fill light to create as little a shadow as possible, is above and as close to the camera as possible! (again, bigger is better) It should be touching your lens! Try that with an umbrella! Flare city…. "Fall off" is easier to create from a box too.
Strip light: A strip light is a light that you use to photograph strippers. Wait, wait, that's another news group. A strip light is nothing but a long skinny light box. I wanted to address this light separately because I've done some interesting experimentation with this light. Check out the "tight head shot" Portraits on my web site @ http://www.michaelray.com . What I found interesting about this light source is that it was "harsh" on one axis and "soft" in the other. What I did was use the strip in a horizontal position. This had the effect to creating a soft shadow beside the nose and it also allowed me to have the light "fall off" quickly below the person's head. If there was a hand below chin in the shot, it got less light than the face, causing the viewer's attention to first go to the "lighter" (eyes) area. So… It was the best of both worlds, soft light yet controllable. The only down side was a pretty funky shaped catch light. Check it out, tell me what you think. I think it's a pretty cool effect.
(F) Freznell: I call this light my "BIG 10 inch". Norman makes two sizes, 6" & 10" freznell spots. I have the 10" (remember… bigger is better) These are very big, bulky lights. They are actually "hot" lights converted to except a flash tube. They are adjustable spot lights and they are quite efficient. A grid spot will be about two stops darker than my "big 10". You can adjust the beam of light more or less wide, as desired. This is by far my favorite light for shooting food. The light projects a crisp shadow so it is easy to control and create shadows by sticking stuff (gobos) between the light and the subject. I also use this light a lot to streak light across a background and also as a 3/4 rear "sun" effect for more "illustrative" shoots. The only thing you have to watch though, is that this light seems to be a little "cool". I usually have to warm it up a little with a 1/8 or 1/4 cto filter. It's a great light, though. If you're a commercial professional photographer, you gotta get one of these lights! They're GREAT!
(G) Optical spots: Norman's optical light is called a Tri-light. Basically this light is a slide projector with a flash tube behind it. You can project slides (like I did on several of my web images) or you can take the slides away and place shapes in the slot and project them into your picture. This light also hat the capability of adjusting down to cover only a very small area. We're talking dime size. The down side to this light is that it is VERY inefficient and you need to work the light in as close as possible so as to get a decent aperture. I don't use this very often, but when you need it, there is no other light that will do. (slight exaggeration)
Pencil lights: My introduction to this news group was regarding someone asking about shooting in a grocery store. I am THE king of grocery store photography. (like anyone cares) I've shot the Penn Traffic (Big Bear, BiLow, others) Annual Report for the past five years or so. I've shot in a BUNCH of grocery stores! People bow in homage at the local Giant Eagle when I enter. Your KING, and former assistant produce manager, said I was full of crap. (I digress) My first post to this newsgroup was about how "pencil lights" were great to use in grocery stores. Pencil lights are nothing but small THIN flash heads (and tubes) with no reflectors built in. The advantage of a pencil light over a normal head is that you can stick these things in places where you normally couldn't stick a head. In the Grocery store situation, they will fit into the are normally occupied by a florescent tube. If you're really careful, you can stick them in meat counters, above the produce, in lamp shades, pretty much anywhere you can hid the wire. I don't use them very often, but again, when ya need them, ya need them bad! Not for the amateur, but I thought that some of you may be interested. (sorry, I forgot to include this in my photo)
(H) Ring Light: A ring light is a flash head that is shaped like a donut, and you shoot through the hole. The flash tubes creates a continuous circle around the lens, thus creating the ALMOST perfect fill light. Instead of creating no shadows, it actually creates shadows all around the subject. It is a really cool effect. If you use this light as a mail light, you can create some very unusual effects. It's hard to avoid RED EYE with a ring light. At least that's what I have found so far. My ring light is very efficient and is fun to experiment with, but I haven't found it o be very practical. Maybe time will change my mind.
You can see Michael Ray's photgraphy at http://www.michaelray.com / http://www.foodportfolio.com or email Michael at mray@michaelray.com