|
|
||||
Food photography tips, tricks, and techniques - Learn to capture steam when photographing foodFirst off, let me tell you that very rarely am I ask to produce steam any more. It seams in this day of digital retouching, it’s easier to retouch in steam instead of shoot it. A retoucher can put the steam where they want it and in exactly the right amount, where as photographers must do the best they can and hope for it turns out. And most of the time, the retouched steam doesn’t look too unrealistic. Producing and photographing steam tends to be a "hit or miss" kind of thing. Photographing steam is sort of like the definition of chaos. There are so many things that go into photographing steam, that it’s very difficult to control all the variables. The temperature of the food in relation to the surrounding air conditions are, of course very important, but there are things physically and photographically that you can do the improve your odds of successfully capturing steam in your food photography. |
Photography Studio Conditions
One of the toughest variables is the actual wind current in the photo studio. Even a slight draft from the heater or air conditioner will greatly affect the shape and direction of the steam. Even the slight draft created by the stylist’s arm will cause a draft that makes the steam take a particular shape. Sometimes those affects will be a positive “happy accident”, but most times they will not. Happy accident or not, the affects of all these subtle influences are seldom repeatable. In other words, if something happens that you really like, its rare that the same situation can be reconstructed so that the same effect can be captured a second time.
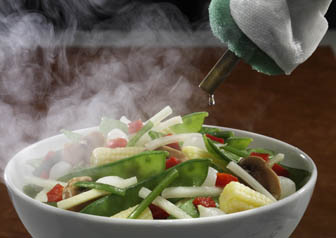
To properly photograph steam, a photographer has to have three things: steam, a dark background, and backlight.
Dark background
I can’t tell you how many times I’ve been asked by Art Directors to make a steam effect on a shot that had a white background. Think about it. Steam is white AND somewhat transparent, so it makes sense (at least to a studio photographer) that you can’t make something separate that’s white from something else that’s white. Well, sometimes you can, but not steam. I’m sure you’re seen white on white portraits or shots of eggs on a white background, right? So you say, how come steam can’t separate from white when eggs can? The answer is simple. Eggs have an edge (visually), where something transparent, like steam, does not.
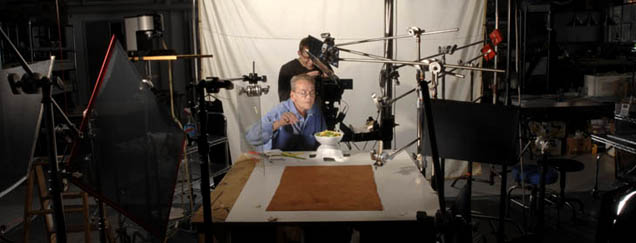
A lot more than you think goes into a professional food shoot.
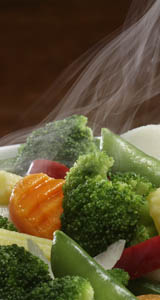
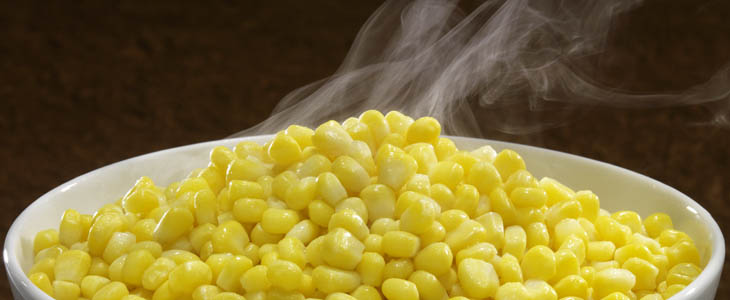
Notice how the dark background makes the steam "pop".
If a white background was used, the steam would blend in and you might not even notice it.
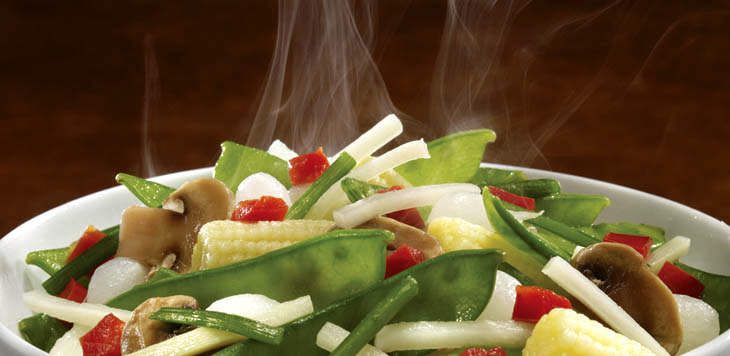
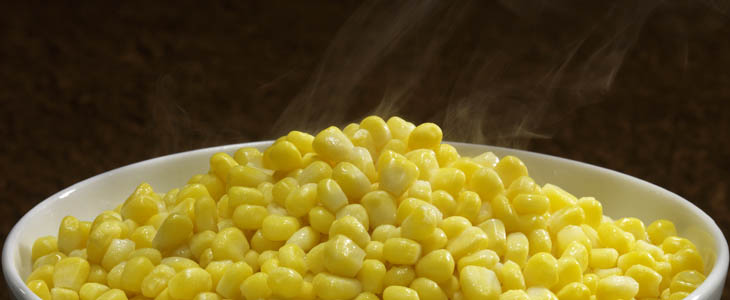
Separating the steam from the background often a problem if you have to shoot on the light colored surface. The best way around this photographic problem is to simply choosing a darker colored background.To make two things separate that are the same color, you need to light on of those things so that they are brighter than the other thing, thus causing separation. You need contrast. If one of those things is transparent, there is no real edge to light, to create separation. To create separation, you need contrast. That’s why you need a dark background to see the steam. Notice on the big corn shots above where the steam is coming off of the corn. There are places where the steam is coming off the corn and overlapping the white bowl. You can’t see the steam where it overlaps the bowl because the bowl is white, can you? It would be the same thing if the background were white, only worse. At least the white bowl is in shadow where a white background is really white. |
|
Steam
Notice that I didn’t say that you needed heat. I said you needed steam. Most amateur photographers think that the object being photographed needs to be the thing creating the steam. That is rarely the fact. Sure, sometimes it is, but most of the time it isn’t. The reason most steam is added to the shot is because it is difficult to create the desired composition quickly enough to make everyone happy and have the subject still hot enough to create steam. I most cases, the steam is made by either a steamer of some kind of smoking object like a cigarette or a “smoke cookie”.
Take the corn shot (below) for example. If you think that we just dumped all that corn into a bowl hot and took a shot, you are mistaken. Each and every kernel of corn was looked at and adjusted, if it wasn’t looking just right. Notice how you can’t see up the bottom of any of the kernels. Notice how the shape of the mound of corn is almost perfect. Notice how the kernels on the side of the mound sort of poke up and make an interesting surface. All that doesn’t happen by accident. The food stylist probably sat there and poked around with a stick for over a half hour to get things just the way the Art Director wanted. Nothing will be hot after that long sitting on set.
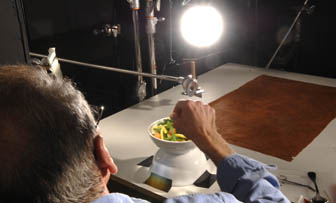
Here's the other end of the steamer
The veggies were spritzed from time to time to keep them moist as the shoot progressed
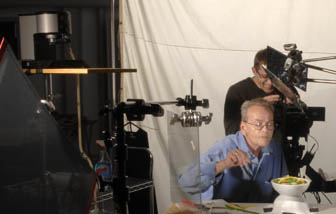
See the steamer in the top left?
Photographic Backlight.The last thing you need to create a good steam photograph is backlight. Without backlight, you’ll never get the true effect of steam. It’s the light coming through the steam that really makes it light up. On these veggie photos, I actually have two lights coming from the rear of the set. My main light is off of the right rear and my steam light is off to the left. It’s hard to see from the photographs I’ve included here but the steam light (from the left) is about the same height as the bowl. That way, the photographic light tends not to affect the veggies very much but only the steam protruding above the bowl. I actually flagged off the steam light so that it didn’t hit the bowl or the background. It’s only lighting the steam and a few of the veggies that poke out of the top of the bowl. |
This is a shot where my "steam light" failed to go off. Notice how much of a difference a backlight makes
Also notice the edge light of the corn from the "steam light"
One of the three things you need to show steam, is a backlight. Notice the bright light coming from behind the set.
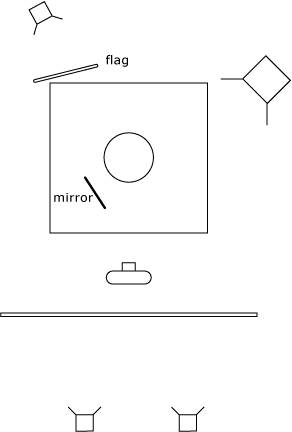
Here’s the basic lighting diagram from my food-packaging shoot. The main light is a 10” freznel spot light coming from 2:00, positioned relatively high so as to light into the bowl. The steam light is coming from 11:00 and is positioned low enough so that it does not affect the veggies too much. The flag is so that the steam light does not light the bowl, only the corn and steam. The mirror helps to light the side of the corn that is in the main light’s shadow. The two fill lights behind the camera are diffused by a 10’x10’ silk, to provide a “true fill” effect.
Care to join our mailing list?
Return to the Food Photography Blog
Didn't find what you were looking for?
.© Michael Ray 2008