|
Food Photography Portfolio - Food Photography Blog - Professional Photography 101 Digital Food Photography TipsDigital food photography tips from a professional digital food photographer |
|||||
|
|
A couple of weeks ago I received an email from a food blogger asking me if I would submit a digital food photography tip that she could publish on her food blog. I gladly agreed and then tried to figure out what the best food photography tip might be for food bloggers. I came up with a bunch of ideas, and to tell you the truth, I had a difficult time picking between them. So that’s how this food photography tip page came about. I’ve come up with what I think are the top ten (or so) food photography tips for the novice digital food photographer. There are, or course, tons more food photo tips that I could come up with, but they tend to be too complex for the novice photographer and besides, I wouldn’t want to give away ALL my secrets. :+) | ||||
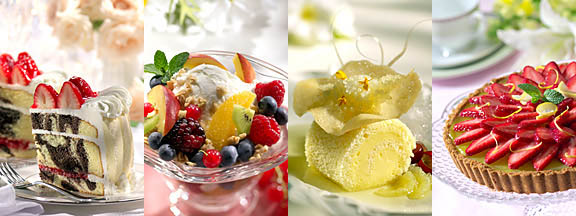
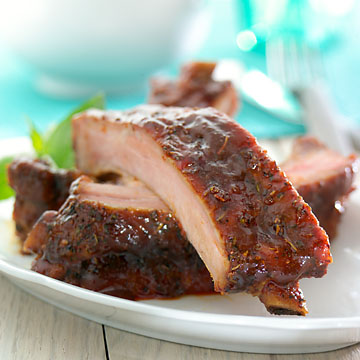
Digital Food Photography Tip #1 - Shoot from a lower angle than you think you should.Some may argue that food is usually seen from a 45% angle looking down, so why would it be a good idea to photograph food from a different angle? The truth is that photographing food from a fork’s-eye view is different, and in the world of photography, different means unusual and unusual means interesting. In digital food photography, interesting is a good thing. Yes, there are some interesting things that don’t end up being “good”, but most interesting things in photography are preferable to boring things. Shooting food from a 45% angle is usually boring. |
 |
||||
|
Another reason that shooting food from a low perspective is a good idea is because the food ends up looking a little more majestic. From a low angle, the food’s thickness and height become much more apparent than if the shot was taken from a high angle or from directly above. As a matter of fact, in my opinion, the “directly above” angle is THE worst angle from which to photography food. If you don’t see the sides to any object, you have not idea if the thing has any height or not. If you shoot a 3” thick steak from directly above, it might as well be 1/4“ thick, and the same goes with every other food. So my #1 food photography tip for you is to try to drop the angle of your camera angle and see if the new perspective doesn’t add a little life to your food photos. |
|||||
|
|
|||||
Digital Food Photography Tip #2 - Crop in tightly.Digital Food photography tip #2 is to crop in tightly. In the world of photography, tighter is almost always better. A tight crop simplifies the shot, makes it more tactile, makes it easier to see the details, and lessens the need for props. The tighter you move in on a food shot, the less stuff there is to distract from what you’re trying to show or communicate. The exception to this might be if you’re trying to show the environment as a major element of the photo. For example, if the objective of the food photo is to show the restaurant as well as the plate of food, then you might want to consider backing out a bit and making the crop include more environment. But if you’re objective is to show the food at its best, then tighter / closer is better. Besides simplifying the shot, moving in closer lets you see the texture and detail of the food better. The closer you get the bigger the food will become in the picture and therefore the more likely you’ll be able to see all the detail the food has to offer. If you’re close enough, you’ll see if the food is shiny (hot) or dull, (usually cold). You’ll more easily see how big the chunks are of how fine the sauce is. If you’re close enough, there are all kind of details you’ll see in your food shot that you wouldn’t have, if the cropping was looser. I’m telling you… Tighter is better! Having a loose crop also creates another problem for the food photographer. If there’s too much negative space around the food, most photographers feel compelled to stick props in that space. That need for props is sometimes a problem because finding appropriate props is often difficult. How many appropriate prop items can you come up with, especially if you’re trying to shoot multiple shots. So if you’re in tight, props are less of a problem, and the food looks better. So, my digital food photography tip #2 is… Keep it tight! Digital Food Photography Tip #3 - Use shallow depth of field.If you keep the cropping in tight, you’ll have a difficult time getting everything in the frame, in focus, and that’s okay… I would suggest that not only is this okay, but it’s preferable and I would even go a step further and try to go with as little “focus” as possible. The key here is to get the right things in focus. If you go with a limited focus “strategery” (I was a Bush fan…:-) you’ll find that the photo usually becomes “prettier”. Some of those background elements become an attractive mass of colored tone, instead of an object that the viewer tries to identify. It simplifies the shot and the viewer’s eye is less distracted by objects in the background or on the plate. Again, the objective of the food shot needs to be taken into account. If you’re trying to shoot mainly the entrée, then your fine, but if the shot needs to emphasize the side dish, then you’ll probably want to extend the focus as far as the corn. It’s subjective… If the shot is for Del Monte corn, then believe me, the corn needs to be in focus. If you just want “a pretty picture”, then minimum focus usually results in prettier food photography. An interesting little side note: Did you know that Del Monte doesn’t let a photographer shoot the bottoms of their kernelled corn? It’s true… Even if there is a field of a thousand kernels of corn, you won’t see any corn butts. Every single piece will be turned around (by the food stylist) so that the butts don’t show. Isn’t that interesting? Personally… I’m a butt man myself. :+) If the background is way out of focus, then the need for appropriate propping is a little less restrictive. Since the background often turns into just fields of color, it doesn’t matter much what those out-of-focus objects are. I will sometimes even use little pieces of colored paper, upside down glasses, or even bottles of Windex, in order to get colors or sparkles in the background of my food photographs. Just be careful. It’s easy to over do this last tip… One thing that I alluded to in the first paragraph of this tip on digital food photography, is that you need to be careful about what exactly is in focus and what is not. Many times when using minimum focus, I’ve struggled with where to place the focus. Sometimes it’s very apparent just where the focus should be, but sometimes the decision is more difficult. Often a chuck of chicken, or the front of a steak, or some other feature will be the obvious “hero” of the shot and the decision is easy. Other times there won’t be any single element that demands the attention of being in focus. Those are the times when you need to take a second and experiment and see what point works best for being the center of attention. Another reason that minimum focus works so well is because the objects that are in focus, jump out at you as being the important elements of the photo. If the only thing in your food photograph that is in focus is the peach, then the photo is obviously about the peach. This technique helps communicate the story behind the photo. Digital Food Photography Tip #4 - Add a little oil.Please don’t get me wrong and think I’m a food stylist, because I’m not. I can’t cook and don’t claim to, but I’ve been watching food stylists for years and have picked up a few tips on what makes food last in front of the camera. The most often used tool I’ve seen is the paintbrush with a little bit of vegetable oil on it. A little oil brushed on things makes them look hot, even if their not, and makes things look wet too. Oil also makes things last longer on the plate. If you end up needing more time than you thought you would, after the hero food hip the table, a little oil will buy you some more time to light, compose or fiddle with your camera. Don’t overdue it though. I’ve seen novice food photographers and food stylists get really carried away with the oil. In fact, I still get ribbed by the food stylist from early in my food photography career. Let me tell you a little story… Probably ten years ago when I was just beginning to specialize in food photography, we were doing a job for a sausage company. While shooting this food and looking at polaroids (remember them) I just thought the sausage patties looked too dry, so I kept insisting to the food stylist that they needed more oil applied to them. Sausages are funny products… If they don’t have enough oil, they look cold, if they have too much oil, then they look greasy. There’s a fine line you have to walk, and with me asking for more and more oil, we ended up crossing that line. I kept saying “more oil, more oil” and they added more oil. Well, film came back and the food looked a little too wet. Okay! Maybe a lot too wet… And now, ten years later, when I say to the stylist that I think the food looks a little dry and they disagree, they say with a smile… “More oil, more oil”! It really has ceased to be funny. :+) So, if you’re going to use oil, don’t overdue it. And remember, not everything on a plate should be shinny. Digital Food Photography Tip #5 - Don’t over prop.Digital Food photography is rarely about all the crap on the table other than the food. If the food is the hero object and that’s what the photo is about, then go easy on the props. The props should enhance the photo without distracting the viewer. If someone looks at the photo and the first thing out of his mouth is “what a wonderful prop”, then you’ve screwed up. Props are used to support the photo and to round out the composition by filling in compositional holes. Any props you use need to be appropriate. You have to think about what would actually be in the environment if this were a real situation, and usually, that means kitchen or dining props. Don’t just pick a book or something and stick it on the dining room table. Sure, it’s possible that a book might theoretically be brought into diner and placed on the table behind the Filet Mignon, but in my house, it would be cause for reprimand. The rule of thumb is, if it doesn’t belong, or if anyone questions the prop, it should be removed. Remember… Less is more. Ya know… I’ve never understood that saying… I thought more would be more… :+) |
|||||
|
Okay, I’ll stop here for now. I have a few more food photography tips I need to work on, so I’ll add more digital food photography tips soon. The next set of food photography tip have to do more with lighting. Please forgive any typos that make it through the editing process. I like to write, but I hate to proofread. And my apologies go out to all my grade school grammar teachers, who are now probably rolling in their graves… :+) |
|||||
|
|
|||||